

About this release
September 2, 2026 – Manage 11.17.0
Manage 11.17 introduces secure email delivery of sale documents to reduce reliance on printed paperwork, streamlines patient documentation with smarter survey tools, and gives clinics more control over how locations appear to patients. This release also extends Australian billing workflows with new options for product exchanges, consolidated QP numbers, and multi-location payments, adds a new payment reconciliation report, and further refines AI-generated patient documents.
NEW FUNCTIONALITY:
- [ALL] Email Delivery Of Sale Documents to Patients
Send Invoices, Quotes, Trials, and Credit Notes to patients by secure email instead of printed paperwork. -
[ALL] Dynamic Data Tags In Survey Templates
Automatically pre-fill known patient information in survey questions, reducing manual entry and improving data accuracy. -
[ALL] Patient Communication Name For Locations
Define a customer-friendly name for each location to use in patient communications and reports. -
[AU] Exchange Option Added To The Patient Sale
Exchange delivered products directly from a Patient Sale without manually creating a credit note and a new sale. -
[ALL] Bulk Export Of Patient Surveys
Export multiple patient surveys at once instead of downloading each one individually. -
[ALL] Payment Reconciliation Report
Review payments, refunds, deposits, and deposit refunds across selected locations and date ranges in a single consolidated report.
IMPROVEMENTS:
-
[AU] QP Number Now Set Once Per Specialist
Set a specialist's QP Number once instead of separately for each location, and include patients from multiple locations in a single bulk claim run. -
[AU] Bulk Payments Now Support Multiple Locations
Reconcile a payer's outstanding invoices across multiple locations in a single action instead of repeating the process location by location. -
[ALL] Improved Language Support For AI-Generated GP Referral Documents
GP Referral documents generated by Manage AI now return in the correct language for English, Spanish, and Dutch.
1. WHAT'S NEW
[ALL] Email Delivery of Sale Documents to Patients
Environment Settings > Notification settings > Email templates
Patients > [Selected patient] > Sale
Patients > [Selected patient] > Consents
Patients > [Selected patient] > Communication Log
Organizations can now send sale documents – Invoices, Quotes, Trials, and Credit Notes – directly to patients by email, reducing reliance on printed paperwork and giving patients faster access to their documents. Each email delivers a secure link to the document rather than a file attachment, and every send is logged in the Audit Trail and the patient's Communication Log, giving staff a clear, traceable record of what was sent, when, and to which address.
NOTE:
- This functionality is available by default. If you do not see it in Manage, contact Auditdata support to have it enabled.
HOW IT WORKS
Email templates control the subject and content of each document type and are managed from Environment settings > Notification settings > Email templates. At least one active template must exist for a document type before it can be emailed to patients.
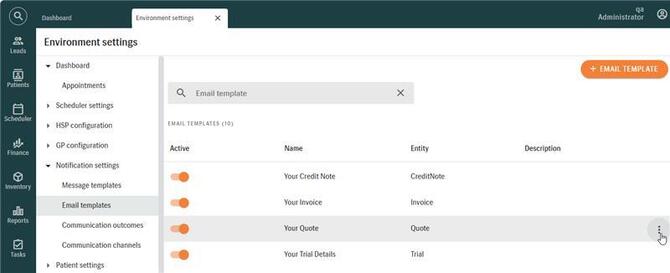
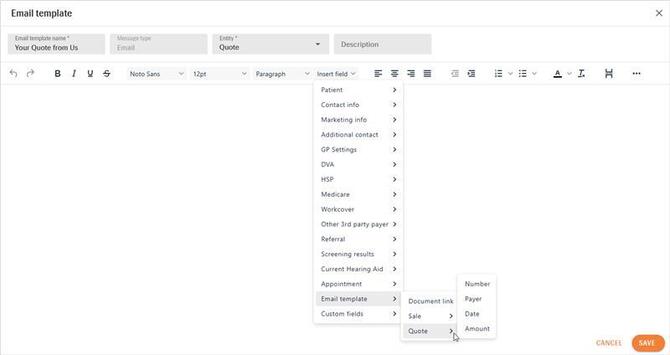
If no active email template exists for a document type, create one using +EMAIL TEMPLATE. The template name becomes the email subject, so it should clearly describe the content for the patient.
The available Insert field options depend on the selected Entity (document type) and allow relevant information to be inserted automatically into the email.
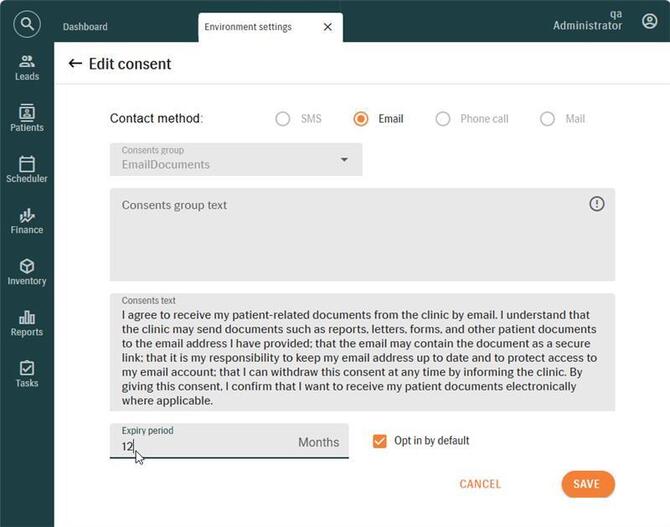
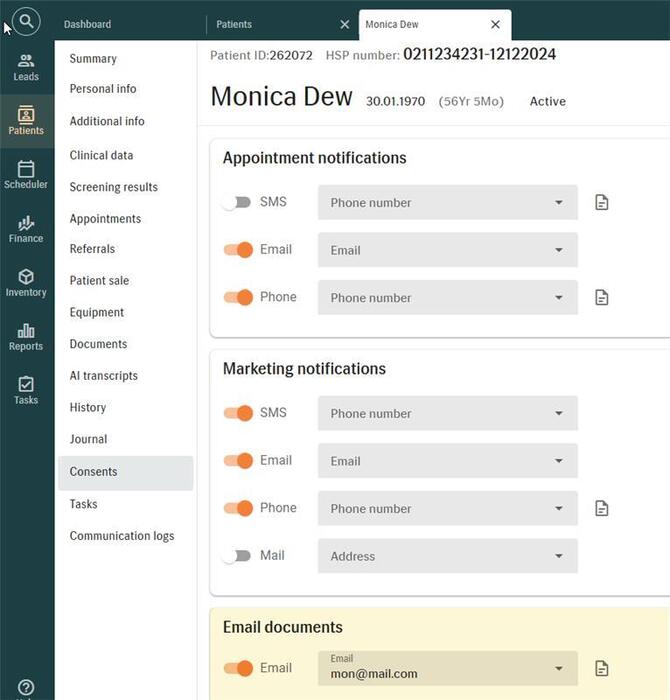
A dedicated Email documents consent has been added to Environment settings > Patient settings > Consents. The consent text can be reviewed and customized to meet the organization's requirements, and an expiry period can be configured if required.
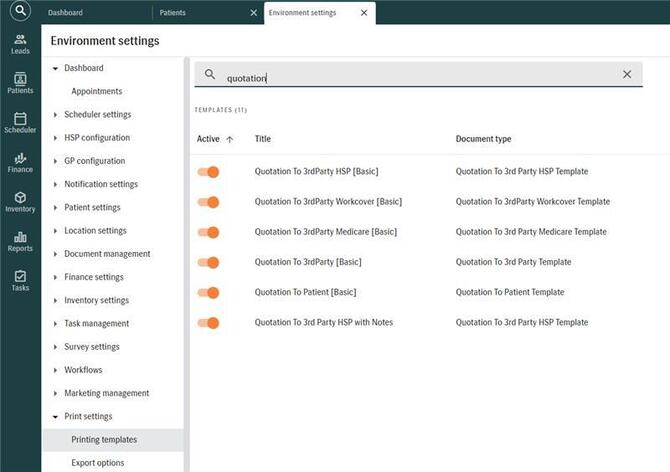
Adding a link to the sale document in the email also requires an active print template for that document type – separate from the email template itself.
Active print templates can be reviewed under Environment settings > Print settings > Printing templates.
With the required templates and patient consent configured, a sale document can be sent to a patient by email.
To do so:
- Confirm the patient has Email document consent enabled on record, including a dedicated contact email address recorded on the Personal Info tab of the Patient profile.
- From the Patient Sale screen, select the document to send and choose the email action. This requires the SendSaleEmail permission and at least one active email template for that document type.
If the patient has not provided consent, the email action icon is disabled.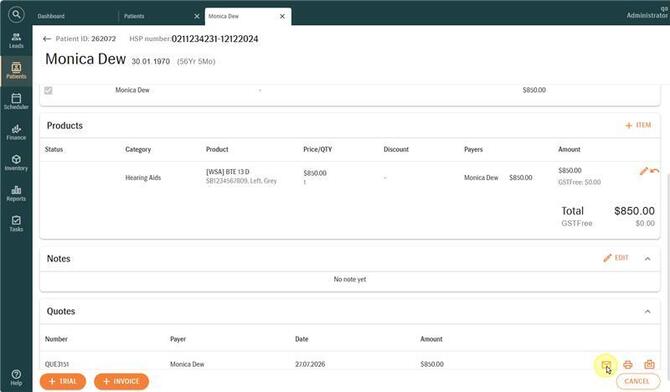
- The email is sent using the configured template, with a secure link to the document instead of a file attachment. If multiple print templates are available for that document type, select one from the Print template dialog.
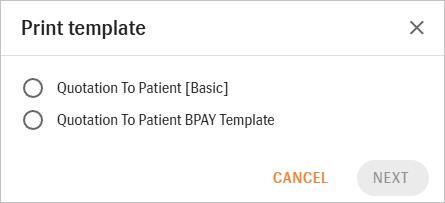
The email is then sent using the designated email address.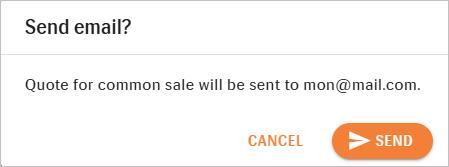
- When the email is received, the patient can access the sale document via a link.
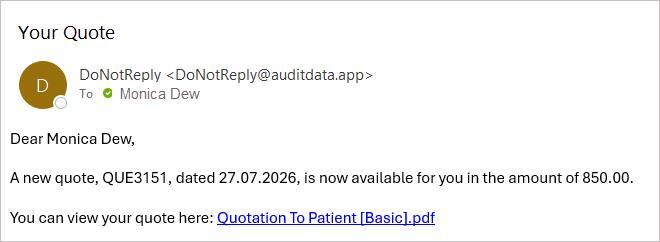
-
The send is recorded in the patient's History (date, time, activity, status, user) and Communication Logs (date, time, recipient address, message content).
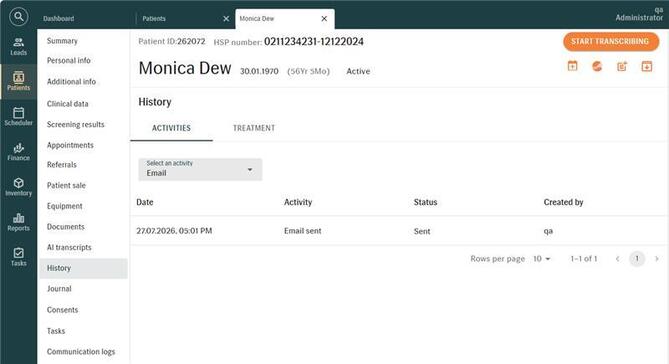
Hovering over an entry in Communication logs shows a quick preview of the message. When you click on it, you can view the full Communication log details.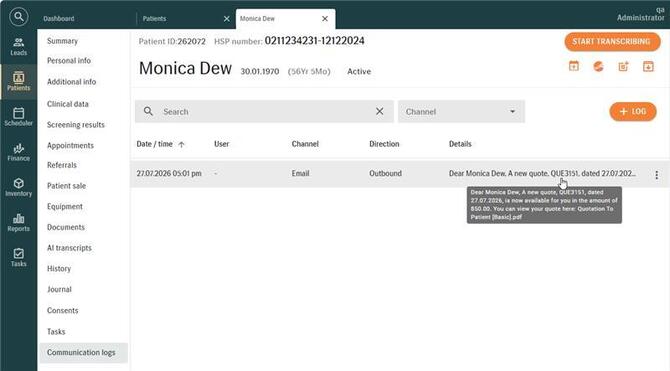
[ALL] Dynamic Data Tags In Survey Templates
Environment settings > Survey settings > Surveys
Patients > [Selected patient] > Surveys
Survey templates can now be configured with dynamic data tags that automatically pre-fill known patient information. Previously, users had to manually re-enter details already stored in Manage, such as demographics or appointment information, which could lead to inconsistent data and longer completion times.
Now, a dynamic data tag can be assigned to a single-line input question in a survey, linking it to the corresponding patient data so it is pre-populated automatically when the survey is opened, reducing manual entry and improving data accuracy.
HOW IT WORKS
To add a dynamic tag to a survey template:
- Navigate to Environment settings > Survey settings > Surveys.
- Open/create a survey template and select a single-line input question.
- In the question's settings panel, click on Prefill for manage data to open additional settings.
- Under Prefill data for, select the record the value should come from (e.g., Patient or Additional Contact).
- Under Insert field, select the specific field to pull in (e.g., Last Name or Contact Person Name).
- Click Prefill to insert the tag into the question.
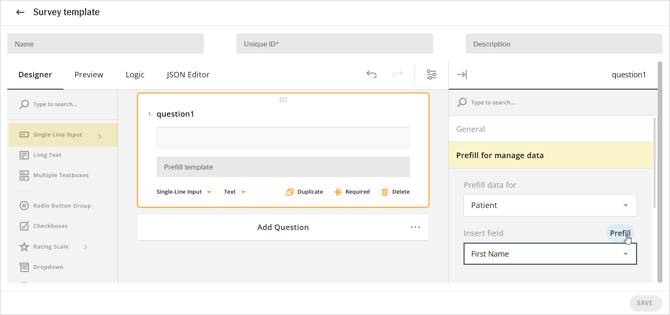
After the tag is added, the Prefill template field will look like this: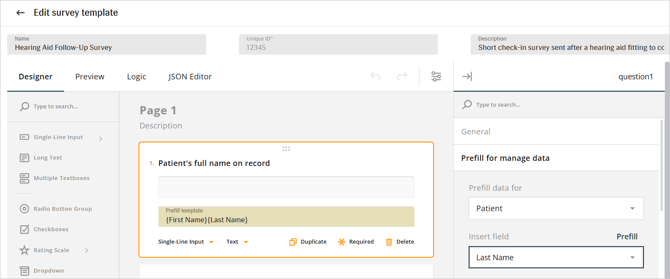
- All changes must be saved, and the survey must be published before the dynamic tags become available.
When a survey based on that template is added to the patient's records:
- Available patient data is automatically inserted into the linked fields.
If the corresponding data is missing from the patient record at that time, the field remains blank and can be completed manually.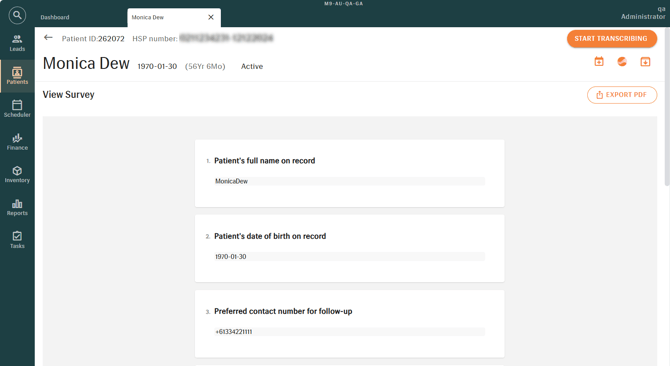
- If that data is later added or changed on the patient record while the survey is still in progress and incomplete, an information bar appears offering to refresh the field.
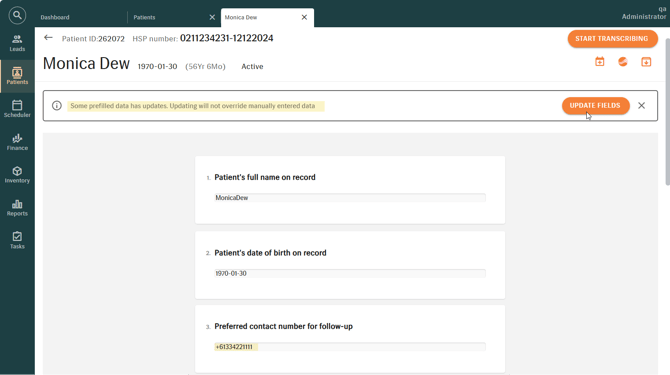
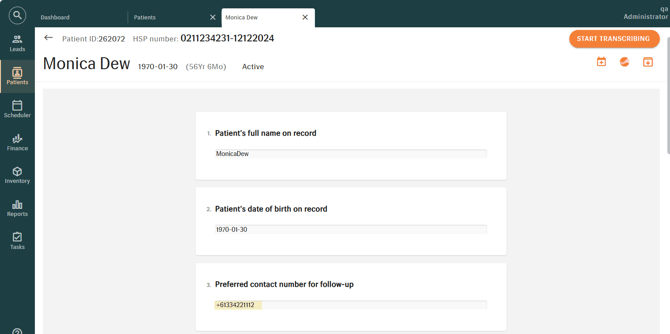
- Selecting Update fills in or updates only the fields that have not been manually edited. Any field changed directly by the user is protected and will not be overwritten.
NOTE:
-
Dynamic data tags are currently supported for single-line input questions only. Other question types, such as single-select or multi-select questions, as well as tables and image-based fields, are not supported.
[ALL] Patient Communication Name For Locations
Environment settings > Locations > [Selected location] > General tab
A new Patient communication name field has been added to Location settings, allowing clinics to define a customer-friendly name for each location for use in patient communications and reports.
Patients frequently recognize their local store by a familiar name, such as a shopping centre, rather than its formal business name. This field enables clinics to display the name patients are more likely to recognize, reducing confusion, unnecessary inquiries to the store, and the risk of missed or delayed appointments.
HOW IT WORKS
- Navigate to Environment settings > Locations. Select the location to be configured.
- On the General tab, optionally enter a Patient communication name.
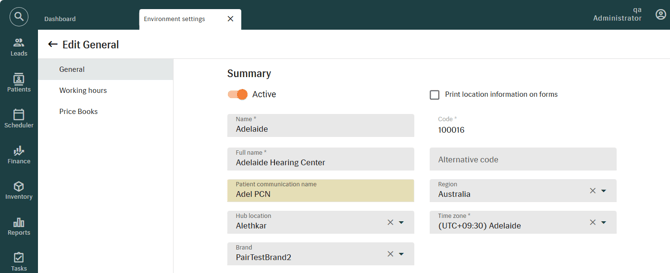
- The Patient communication name is available as an insert field in SMS notification templates, email notification templates, patient letters, and report templates.
Users can add the Patient communication name field to these templates to display the recognizable name to patients instead of the internal or legal name.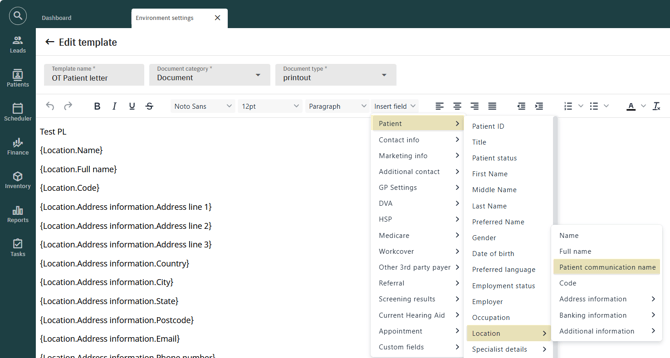
NOTE:
Patient communication name does not replace Name or Full Name in any existing context and is used exclusively for patient-facing communications and report templates.
[AU] Exchange Option Added to the Patient Sale
Patients > [Selected patient] > Patient sale
Patients > [Selected patient] > Equipment
Delivered products can now be exchanged directly from a Patient Sale, for example, to change a device type or accessory after delivery, eliminating the need to manually create a Credit Note and a new Sale for each exchange. Commission is recalculated automatically as part of the exchange, where commission functionality is enabled.
EXCEPTIONS
- Only delivered physical products are eligible for exchange; Services, Repair Services, and Loss & Damage (L&D) Warranties cannot be exchanged, nor can items with a status of Exchanged, Credited, Replaced, or On Trial.
- Exchange is not available on Patient Sales that include an HSP payer.
HOW IT WORKS
- On an invoiced Patient Sale with at least one eligible delivered item, click +Exchange.
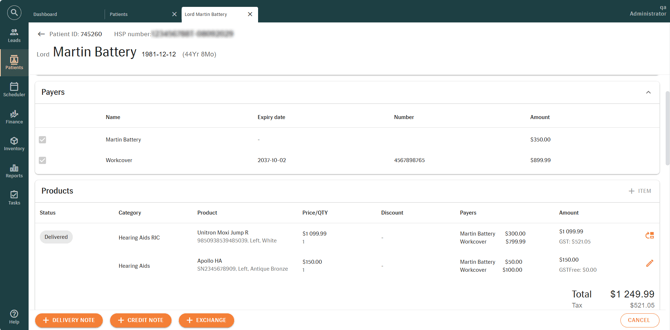
- Select one or more items to exchange, choose a Stock Action for each, and confirm the Credit Note Reason (defaults to "Exchange").
Only delivered items can be selected; non-delivered items are shown in the list but stay disabled until they've been delivered.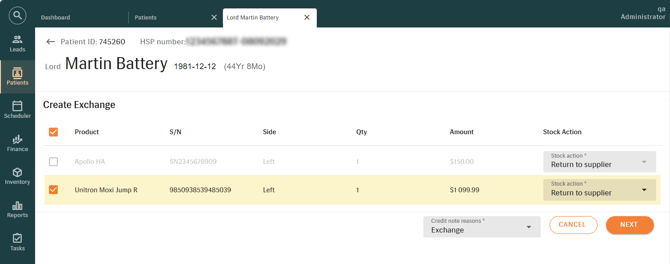
- Click Next, then select replacement product(s) and configure the payer allocation for each, as when adding an item to a Patient Sale. Each item can only be replaced with one new item, and the quantities must match.
If the exchanged item has auto delivery enabled, its replacement's serial number must be entered now, since a new invoiced sale is always created immediately with a delivery note for the auto delivery item. Otherwise, it can be entered later.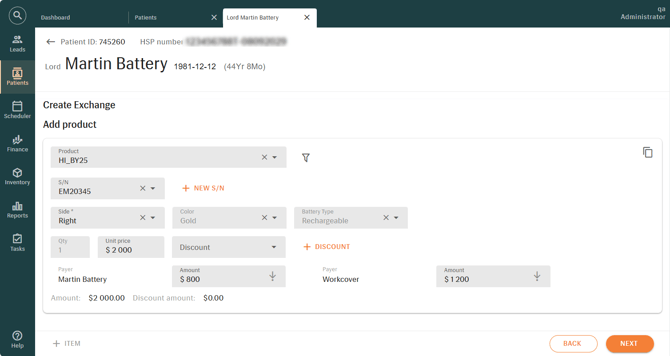
- Review the Exchange Summary, which shows the original and replacement items with the payer split.
If the original sale was paid, the amount already paid can be reassigned to the new sale: the original sale records this as a Payment Transfer refund, and the new sale automatically receives a matching Payment Transfer payment, so the patient does not have to pay again. If unpaid, the Payments section stays inactive.
When commission functionality is enabled, a Commission section is pre-filled from the original sale and can be edited independently of the payment transfer.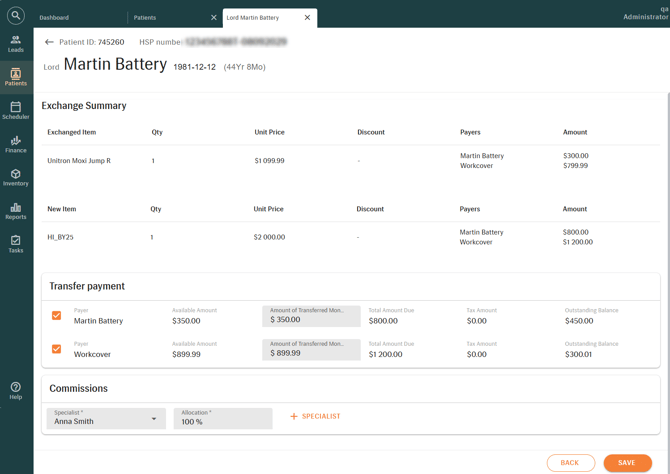
-
Save the Exchange. This creates a Credit Note for each payer on the exchanged items, updates their status to "Exchanged" on the original sale, and generates a new, invoiced Patient Sale with the replacement products and the remaining sale details (appointment, payer, specialist, etc.).
Products set to auto-delivery get a delivery note automatically, and the new sale can then be processed as normal, including delivery, payment, or further exchanges.
Original sale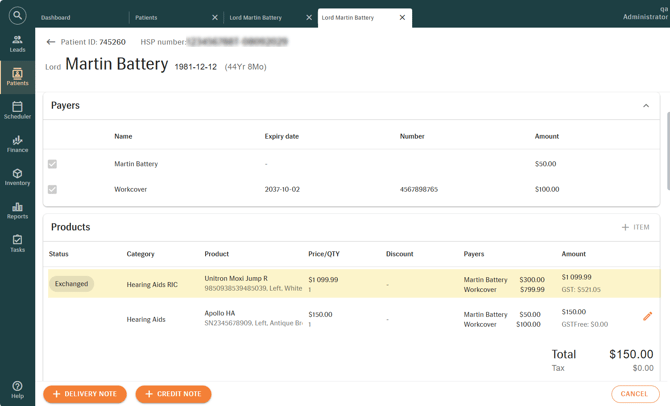
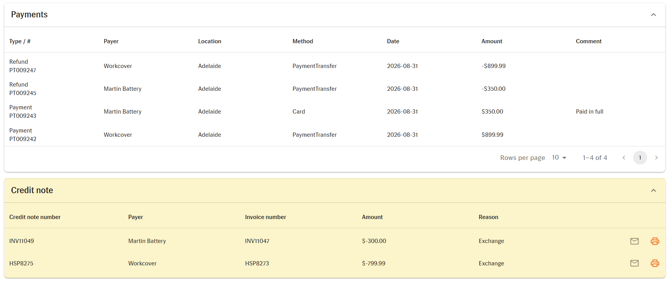
New sale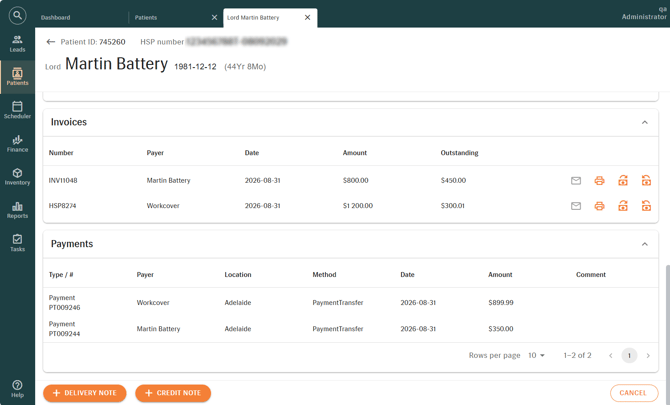
- Exchanged items appear as "Returned" on the Equipment page.
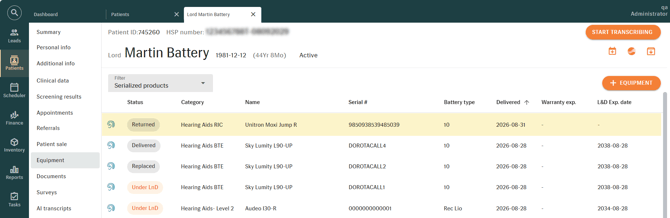
Inventory is updated to the Stock Status corresponding to the Stock Action selected during the exchange.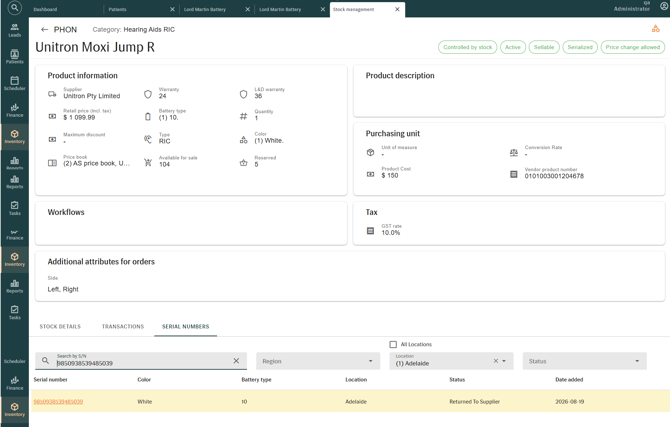
- Once the replacement item is delivered, it behaves as a newly sold item, including the ability to add Repair Orders and Loss & Damage (L&D) Warranties.
NOTE:
There is no limit to how many times a sale can be exchanged; each new sale created by an exchange behaves as a normal sale.
[ALL] Bulk Export of Patient Surveys
Clinicians can now export multiple patient surveys at once directly from the Patient Surveys dialog, instead of opening and exporting each survey individually. This makes it faster to assemble a complete set of surveys for a patient, for example, when preparing a transfer package or responding to a record request. Only the latest version of each survey is included, and every export is logged for audit purposes.
REQUIRED PERMISSIONS
A dedicated ExportPatientSurveys permission controls access to the export action on the Patient Surveys dialog.
- Users with this permission can trigger a bulk export of surveys from the dialog.
- Users without the permission will not see the export action.
HOW IT WORKS
To export multiple patient surveys at once:
- Navigate to Patients > [Selected patient] > Surveys.
- Select the export action to open the bulk export options.
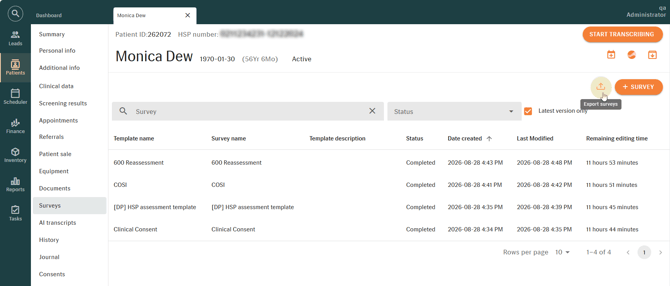
- Choose a date range to include only surveys created within that period.
- Optionally filter the surveys by status and/or template before exporting.
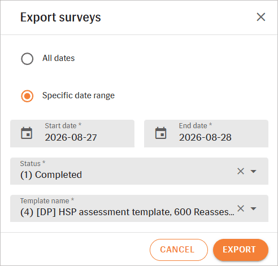
- Click Export.
The system generates a ZIP archive containing one PDF per survey (only the latest version of each).
NOTE:
Bulk survey exports can currently be generated for one patient at a time. Exporting surveys for multiple patients in a single operation is not supported.
[ALL] Payment Reconciliation Report
A new Payment Reconciliation Report is now available in Manage. The report provides a consolidated view of payment activity across selected locations and date ranges, allowing users to review payments, refunds, deposits, and deposit refunds in a single report. With transaction-level details, subtotals, and payment method summaries, it helps streamline reconciliation and auditing processes.
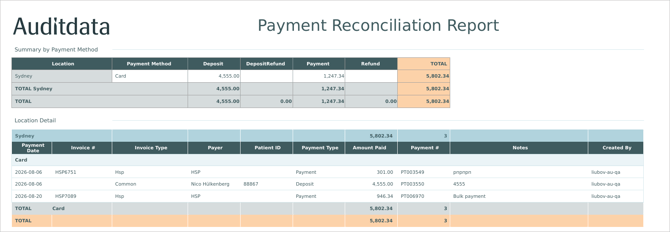
The report includes:
- Location and payment method grouping
- Totals for deposits
- Totals for deposit refunds (displayed as negative values)
- Totals for payments
- Totals for refunds (displayed as negative values)
- Roll-up totals by location and payment method
- Payment date
- Invoice number and invoice type
- Payer details
- Patient ID (for patient-paid transactions only)
- Payment type (Payment, Refund, Deposit, or Deposit Refund)
- Transaction amount
- Payment, refund, deposit, or deposit refund number
- Transaction notes
- The user who created the transaction
Filters available:
- Date range (payment transaction date)
- Location status (active/inactive)
- Areas
- Regions
- Locations
- Payment type (payment, refund, deposit, deposit refund)
- Payment method
Report data can be exported to PDF, CSV, Excel, and other supported formats for further processing.
2. IMPROVEMENTS
[AU] QP Number Now Set Once Per Specialist Instead of Per Location
Environment settings > Scheduler settings > Specialists > [Selected specialist] > General tab
Previously, a QP Number had to be entered separately for each location a specialist worked at. The QP Number is now a single field that applies across all of a specialist's locations, replacing the repeated per-location entries. Provider # is unaffected by this change and continues to be set per location and payer.
As a result, bulk Battery & Maintenance claim generation can now include patients from multiple locations in a single run. Previously, claims could be blocked if the selected specialist was not assigned a QP number at every relevant location. Now, claims are only blocked if the specialist has no QP number at all.
HOW IT WORKS
- Navigate to Environment settings > Scheduler settings > Specialists and open the specialist to review.
- On the General tab, a single QP number field is now available and applies across all of that specialist's locations.
- The QP Number field is no longer shown for individual locations.
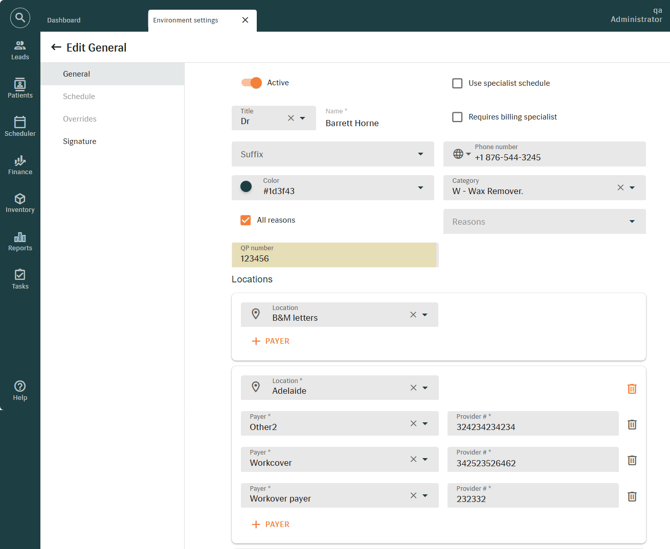
NOTE:
- Existing QP numbers are migrated automatically as part of the upgrade to Manage 11.17. If a specialist's locations previously shared the same QP number, it will appear in the new field. If they differed, the field is left blank and requires manual entry.
- After upgrading, we recommend reviewing each specialist's General tab to confirm the QP number is populated correctly before generating claims.
[AU] Bulk Payments Now Support Multiple Locations
Finance > Bulk payments
Bulk Payments now allows a centralized finance user to select one, several, or all eligible locations for a chosen third-party payer, view outstanding invoices from every selected location, and post one reconciliation across the enterprise in a single action, instead of repeating the process location by location.
Locations available for selection are limited to those the logged-in user already has permission to access, and each posted allocation continues to record invoice, payment, user, and location, so cross-location reconciliation stays auditable.
HOW IT WORKS
To reconcile a payer's outstanding invoices across multiple locations:
- Navigate to Finance > Bulk payments and click + Bulk payments to start a new reconciliation, then select a payer.
- In the Payment option section, select the location where the payment is being processed, the payment date, and the payment method.
- In the Invoices section, select a payer, then select several or all eligible locations whose invoices should be included, using the new location multiselect and the option Select all locations. Only locations the user has permission to access are shown.
- Set the date range for outstanding invoices to include. The end date defaults to today, and the range can span up to 90 days.
- Outstanding invoices from all selected locations display together in a list, with each invoice showing its location.
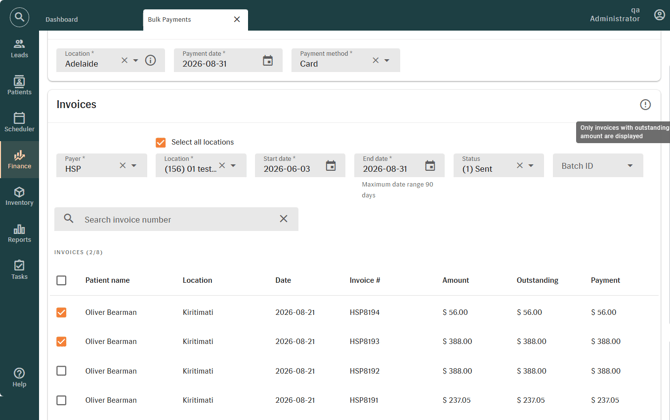
- Select individual invoices, or use Select all to include every invoice across the full list, including invoices on additional pages.
Only invoices with an outstanding amount are displayed in the list. Fully paid invoices will not appear even if they fall within the selected date range.
- Optionally, use the new Search invoice number field to find a specific invoice among the results already filtered by the selected parameters.
The full invoice number must be entered, as partial numbers will not return results. The search is not case-sensitive.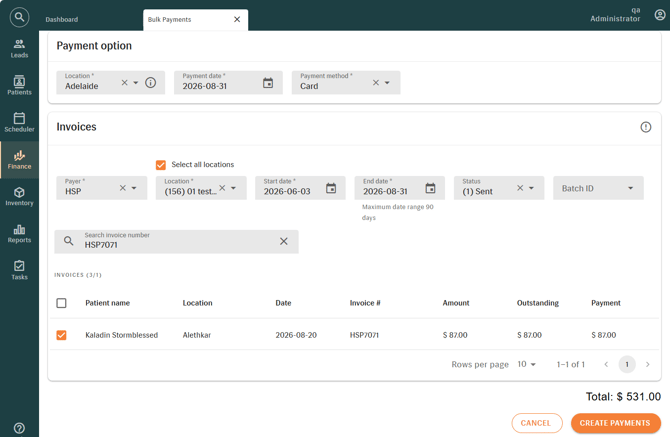
- Existing selections are kept when searching. However, changing any of the filter parameters clears previous invoice selections.
- Select Create payments to process the reconciliation. The payment is allocated across all selected invoices in a single action.
-
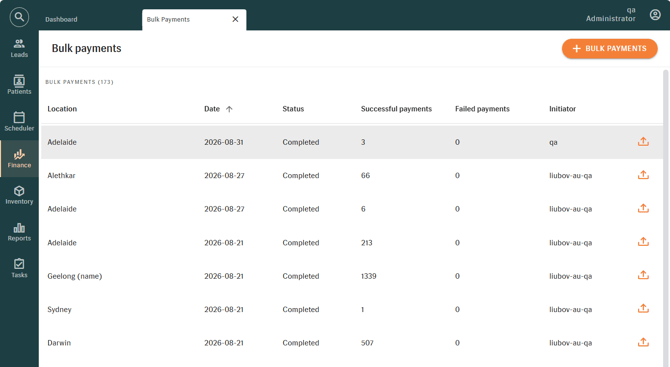
After creating a bulk payment, it can be reviewed from the Bulk payments history page, which can now be sorted by date, status, and initiator.
The date shown on the Bulk Payments history page reflects the company's configured time zone, not the date on which the payment was actually created. As a result, a payment created on one calendar day may display under a different date if the company's time zone causes the recorded time to fall past midnight.
Upon bulk payments reconciliation, there is a live update showing the status of the operation (Completed, Partially completed, Failed) and the number of successful and failed payments. You can check the results by exporting the CSV file.
[ALL] Improved Language Support For AI-Generated GP Referral Documents
Patients
Manage AI's prompt for the GP Referral document has been updated so that generated documents are returned in the correct language for English, Spanish, and Dutch versions, with no other change to their format or content.
3. TECHNICAL REQUIREMENTS UPDATE
3.1 Current System Requirements
| Operating systems | Windows 10, Windows 11 |
| Supported browsers | Chrome (latest version), Edge (latest version) |
| Language preferences | English |
| Country layers | UK, AU, US, NZ, SG, HG, JP |
| Bridge version | Bridge BE 2.5.0 + Client 2.5.1 |
| Engage version |
1.3.3, 2.0.0 |
| Zapier version | AuditData (4.3.1) |
| Screen resolution | 1920x1200 |
| Internet connection speed | 10Mb/s |
3.2 DWH Schema Changes
NOTE:
|
COUNTRY |
TABLE | CHANGE | COLUMN NAME |
| ALL | Dim_Specialist | Added | RequiresBillingSpecialist |
|
ALL |
Dim_SpecialistLocationLink | Modified | QpNumber is not populated anymore. QpNumber in Dim_Specialist should be used instead. |
4. SOLVED ISSUES
[AU] Retail Price Changes Not Reflected In The Default Price Book
Environment settings > Finance settings > Price books
-
Users previously experienced an issue where updating a product's retail price through import updated the Retail Price field only, leaving the price shown in the Default Price Book unchanged. This has been corrected, and the Default Price Book now reflects the updated price.
[ALL] Inventory Settings Permission Also Grants Access To Document Management
Environment settings > Document management
Environment settings > Inventory settings
-
Previously, granting a user the Inventory Settings permission also gave them access to Document Management, even when they were not meant to have it. Dedicated permissions have been introduced for Document Management, so access to it can now be controlled independently of Inventory Settings.
[ALL] Product Search Not Returning Results In Price Books
Environment settings > Finance settings > Price books
-
Searching for a product by its full name on the Product tab of a Price Book previously returned no results. This has been fixed, and product search now returns matching results as expected.
[ALL] Edited Items Move To The Bottom Of The Invoice In Fast Track Sales
Patients > [Selected patient] > Patient sale
-
In Fast Track sales, items initially displayed in the order they were added, but editing or modifying an item afterward moved it to the bottom of the invoice list, including in the print view. This has been corrected, and edited items now remain in their original position.
[AU] "Product Was Not Found" Error Blocks Sale When Adding Certain Services
Patients > [Selected patient] > Patient sale
-
When attempting to add certain services to a sale, users could encounter a "Product was not found" error, blocking the sale from being completed. The issue has been resolved, and the service can now be added successfully.
[AU] New HSP Price Books Fail To Apply Set Prices When Creating A Sale Or Invoice
Patients > [Selected patient] > Patient sale
-
When selecting or unselecting an HSP payer on a Patient Sale, a manually selected Price Book could silently reset to the Default Price Book, resulting in incorrect prices being applied without the user noticing. This has been resolved, and the selected Price Book is now retained.
[AU] Specialist Dropdown Not Displayed On The Product Card When QP Validation Is Enabled
Patients > [Selected patient] > Patient sale
-
When QP Validation was enabled for a location, expanding the Specialist field on a fitting or non-fitting service's product card did not show the dropdown list of other QP-qualified specialists, limiting users to the specialist pre-filled from the appointment. This has been resolved, and the dropdown now displays all specialists assigned to the location who hold a QP number.
[AU] Overpayment Message Not Displayed When Outstanding Balance Is Already Zero
Patients > [Selected patient] > Patient sale
-
The informational message warning against overpayment was not displayed when a user attempted to take a payment on a sale with an outstanding balance of zero. This has been addressed, and the message now displays correctly in this case.
[AU] Invoice Date Of Issue Changes Depending On The User's Local Time Zone
Patients > [Selected patient] > Patient sale
-
An issue where the Date of Issue on an invoice could shift by a day when a user's computer was set to a different time zone than the company's has been fixed. The Date of Issue now displays consistently regardless of the viewing user's local time zone.
[AU] Serial Numbers Missing From The Purchase Order Section On The Patient Sale
Patients > [Selected patient] > Patient sale
-
An issue where serial numbers did not display in the Purchase Order section of a Patient Sale, even though they displayed correctly in Order Management, has been fixed. Serial numbers now display correctly in the Purchase Order section as well.
[AU] HSP Batch File Prints The Billing Specialist's QP Number Instead Of The Service Specialist's
Patients > [Selected patient] > Patient sale
Finance > HSP > Claims
-
An issue where the HSP batch file could print the Billing Specialist's QP Number instead of the QP Number of the specialist who performed the service has been corrected. The batch file now prints the correct specialist's QP Number, matching the claim form.
[AU] Incorrect Fitting Date Exported To HSP Claim File After Appointment Rescheduling
Patients > [Selected patient] > Patient sale
Finance > HSP > Claims
- Previously, the HSP batch export file could include an outdated fitting date for a patient whose appointment had since been rescheduled, rather than the corrected date. This has been resolved, and the exported file now reflects the correct fitting date.
[ALL] Hearing Screener Results Report Displays The Wrong Location For Some Screenings
Reports > Operations > Hearing Screener Results
-
Users previously experienced an issue where the Location column on the Hearing Screener Results report could show the patient's location instead of the location where the screening was actually performed. This has been corrected for screenings recorded going forward.