

About this release
October 6, 2026 – Manage 11.18.0
Version 1.0
Manage 11.18 introduces email delivery of appointment notifications to patients, location-based controls for invoicing, and support for importing external forms that Manage fills in automatically with patient information. This release also extends Australian HSP workflows with support for assisted listening devices (ALD), adds a new Payment Summary Report, makes scheduling and sales workflows quicker with hidden unavailable days and automatic suggested products, and extends reporting with deposits, appointment resources, and communication log data in the data warehouse.
NEW FUNCTIONALITY:
- [ALL] Email Delivery Of Appointment Notifications To Patient
Send appointment confirmations, reminders, and follow-up messages by email in addition to SMS. - [AU] Location-Based Invoicing Restriction
Limit manual creation of sales documents to a user's assigned location and their Hub and Network. - [ALL] Reorganized Patient Letter Settings And Support For Dynamic Fillable Documents
Import external PDF and DOCX forms and automatically populate them with patient information stored in Manage. - [AU] HSP Claiming Support For Assisted Listening Devices
Sell and claim assisted listening devices under HSP alongside hearing aids. Ear assignment, pricing, and subsidy details carry through quotes, invoices, and claim files. - [ALL] Payment Summary Report
Confirm payment totals by location, payment method, and payment type without reviewing individual transactions.
IMPROVEMENTS:
- [ALL] Hidden Unavailable Days In Scheduler
Hide non-working and fully booked days to find available appointments faster. - [ALL] Improved Suggested Products Workflow During Sales
Open suggested products automatically when an item is added to a sale. - [ALL] Dedicated Surveys Tab For Patient And Lead Records
Manage all surveys for a patient or lead from a single tab. - [ALL] "Select All Locations" Option Moved To The Location Dropdown
Select every location you have access to from within the Location dropdown in Finance and Inventory. - [ALL] Appointment Details Report Now Includes Resources
View the resources of each appointment in the report. - [ALL] Payments And Refunds Report Now Includes Deposits
Review deposits and deposit refunds alongside payments and refunds. - [ALL] Communication Log Data Now Available In The Data Warehouse
Include SMS and email communication activity in data warehouse reporting.
1. WHAT'S NEW
Environment settings > Patient settings > Consents
Patients > [Selected patient] > Consents
NOTE: This feature can be enabled for your clinic upon request. Contact Auditdata Support for assistance.
HOW IT WORKS
Template configuration
To configure email notification templates, navigate to ENVIRONMENT SETTINGS > NOTIFICATION SETTINGS > NOTIFICATION TEMPLATES.
-
Create a new notification template using the button +NOTIFICATION TEMPLATE and select "Email" as the NOTIFICATION TYPE.
- Choose a PURPOSE: Appointment reminder, Appointment confirmation, or Appointment follow-up. The system automatically applies a default subject line and enables the relevant insert fields.
NOTE: Only one Appointment confirmation template and one Appointment reminder template can be configured per clinic. There is no limit to the number of Appointment follow-up templates. - Enter a Notification template NAME and DESCRIPTION, and select the APPOINTMENT STATUS that should trigger the notification in "Sent reminder when appointment status is". Fields marked with an asterisk (*) are mandatory.
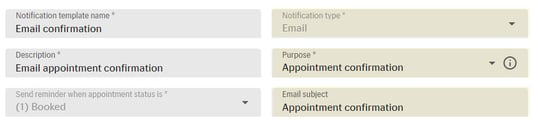
- Compose the email using the rich text editor. Click the "..." (more options) icon in the toolbar to expand the full set of formatting options.
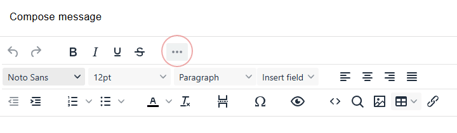
- You can optionally add an image or attach a document of up to 5 MB.

- Additionally, for Appointment Confirmation templates, you can first configure patient response options and then add them to the email body using the "Patient response links" insert field.
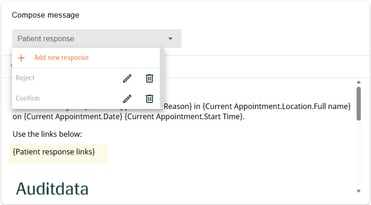
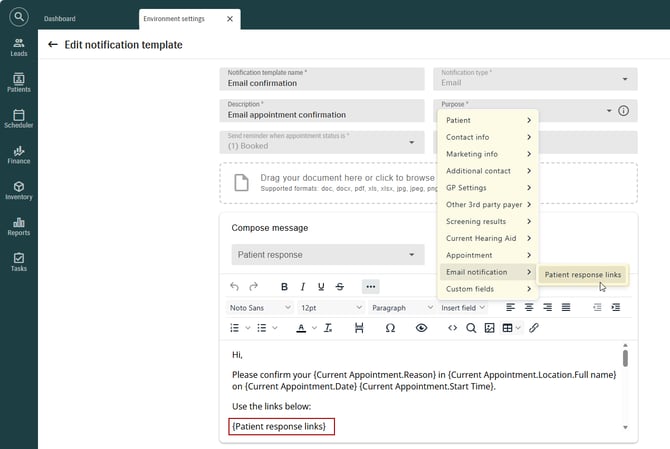
Upon receiving the message, patients can respond directly from the email by clicking one of the available response links.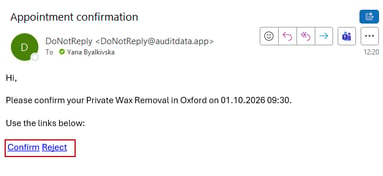
- Use the TEST button in the bottom right corner of the screen to send a sample email before activating the template.

Consent configuration
To receive appointment-related emails, both of the following consents must be enabled:
- The clinic's Appointment notifications email consent.
- The patient's personal email consent.
An email notification is sent only when both consents are active. Messages are delivered to the email address stored in the patient's consent record.
To enable the required consents:
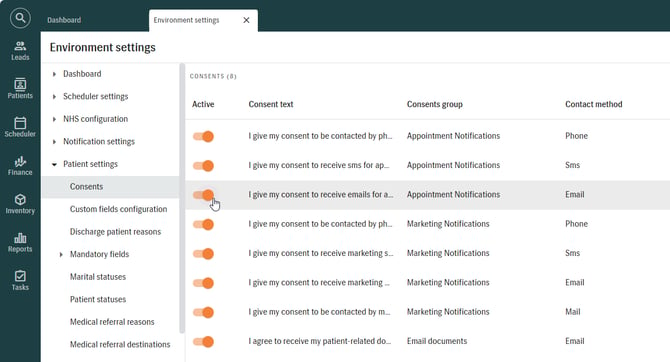
- Go to ENVIRONMENT SETTINGS > PATIENT SETTINGS > CONSENTS and activate the corresponding Appointment notifications email consent.
- Go to PATIENTS > [SELECTED PATIENT] > CONSENTS and enable email consent for the patient.
The patient's record must contain an email address before it becomes available in the EMAIL dropdown list in the APPOINTMENT NOTIFICATIONS section.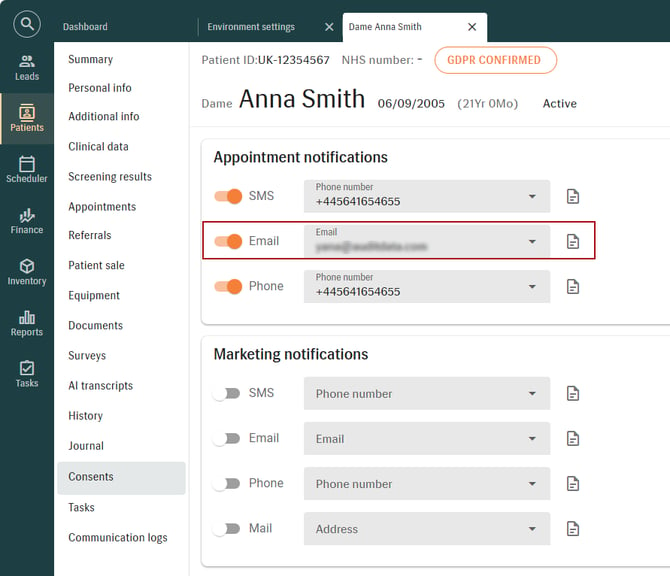
Appointment booking
Email notifications are triggered automatically based on the appointment status set when an appointment is created or updated in SCHEDULER, and this status must match the trigger configured on the relevant Notification template.
Emails are then sent according to the selected purpose:
REMINDERS: two days before the appointment
CONFIRMATIONS: 15 minutes after the appointment is booked
FOLLOW-UPS: two hours after the appointment ends
NOTE: If an appointment is cancelled, any remaining scheduled emails for it are cancelled as well, and email notifications can run alongside SMS notifications without conflict.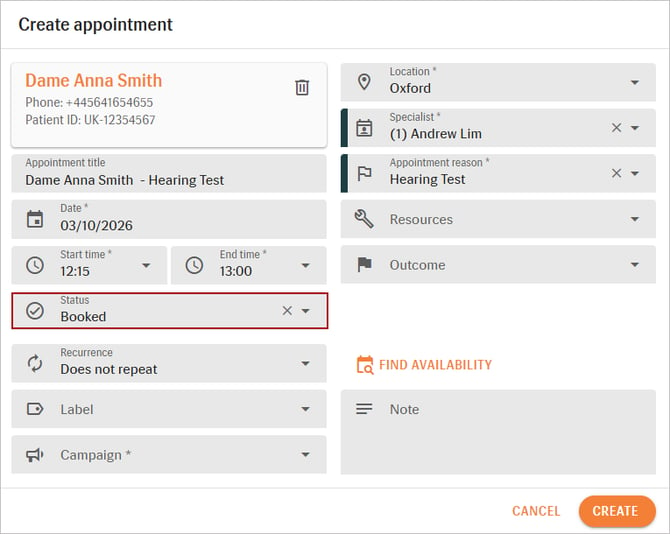
Email communication logging
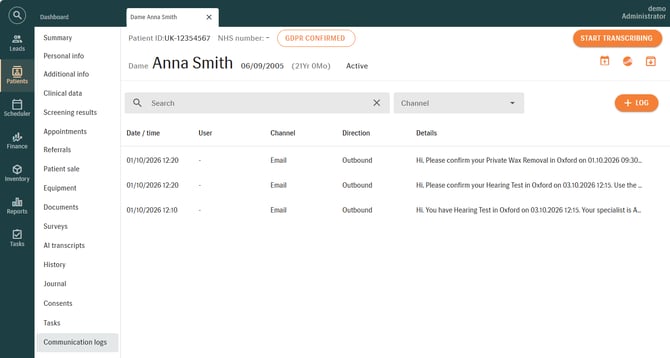
All sent emails, including any patient responses to appointment confirmation requests, are recorded in the patient's HISTORY and COMMUNICATION LOGS.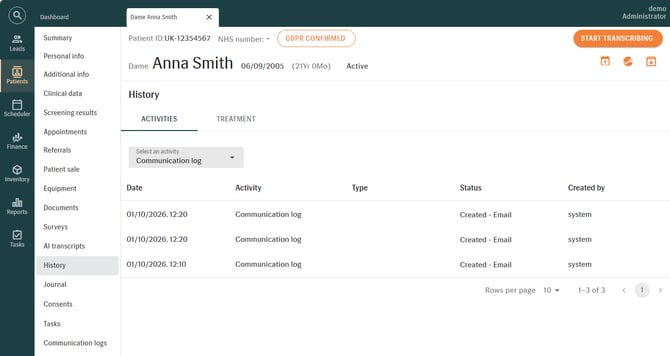
[AU] Location-Based Invoicing Restriction
HOW IT WORKS
- Go to ENVIRONMENT SETTINGS > FINANCE SETTINGS > SALE RELATED > INVOICING RESTRICTION and enable "Restrict invoicing outside Hub and Network".
The setting is turned off by default. Once turned on, it applies across your entire Manage setup.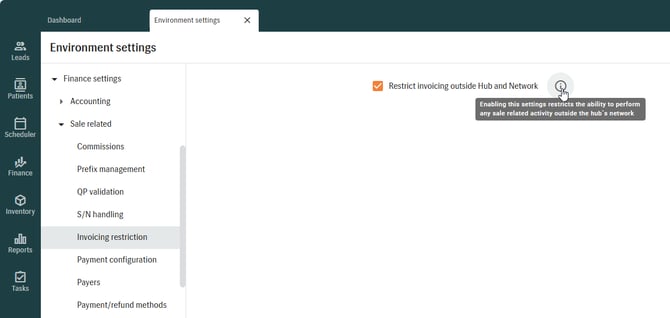
-
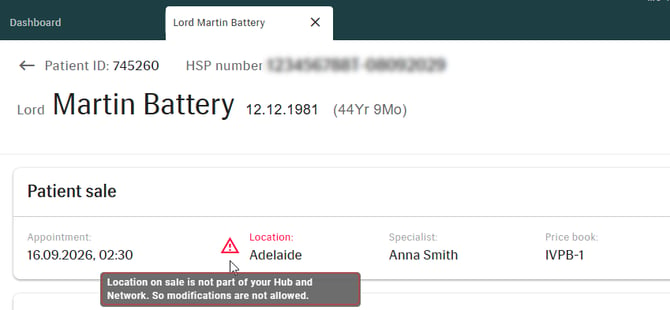
Once the setting is enabled, any location outside the user's assigned network location is shown with a warning during manual sale creation.
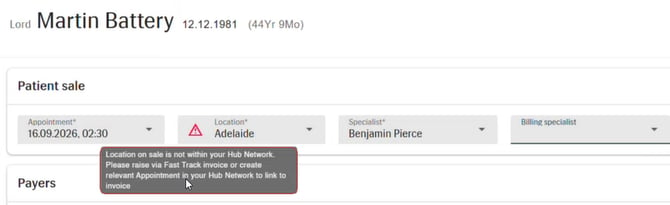
- For locations the user is not authorized to use, the following actions are unavailable:
- Deposits, payments, and refunds creation;
- Invoice, purchase order, quote, delivery note, credit note, trial documents creation;
- Products cannot be added, modified, or deleted on the sale;
- Replacement Exchange options are unavailable;
- Notes cannot be created;
- Sales in "Draft" status cannot be deleted;
- [AU] HSP details section is disabled.
NOTE:
- Sales created through the API or as Fast Track sales are not affected by this restriction.
- When creating bulk claim quotes or bulk payments, users see only the locations to which they have access.
PREVIOUSLY CREATED SALES
- Users can still open and review a previously created sale at a location outside their authorized scope.
- A warning next to the Location field explains that the user does not have access to that location. Products cannot be added, changed, or deleted, and most actions that change the sale are not available.
- For sales in Quoted, Invoiced, Delivered, and Credited status, users can still print and email sales documents.
[ALL] Reorganized Patient Letter Settings and Support for Dynamic Fillable Documents
Patients > [Selected patient] > Documents
Users must have ViewPatientLetter and EditPatientLetter permissions to access and manage ENVIRONMENT SETTINGS > PATIENT LETTERS > PATIENT LETTERS TEMPLATES > DOCUMENTS.
HOW IT WORKS
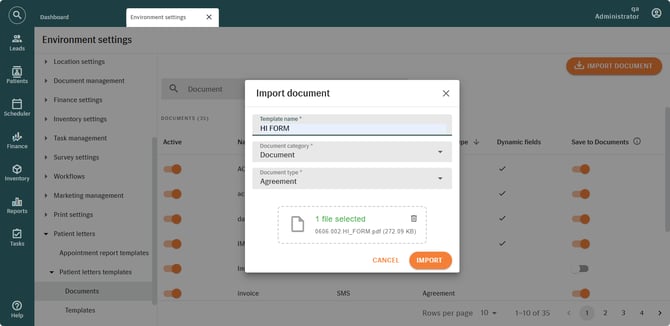
Patient Letters Templates settings are now split into two separate tabs, DOCUMENTS and TEMPLATES, under ENVIRONMENT SETTINGS > PATIENT LETTERS > PATIENT LETTERS TEMPLATES, so documents and templates can be configured and managed separately.
- In the DOCUMENTS tab, click IMPORT DOCUMENT, enter a name, select a document category and type, and upload a PDF or DOCX file, including those with dynamic form fields such as PDF AcroForms or DOCX content controls.
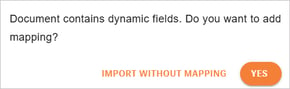
- If the file contains dynamic fields, a message asks whether to add mapping now. Select IMPORT WITHOUT MAPPING to skip mapping for now, or YES to open the Data mapping dialog.
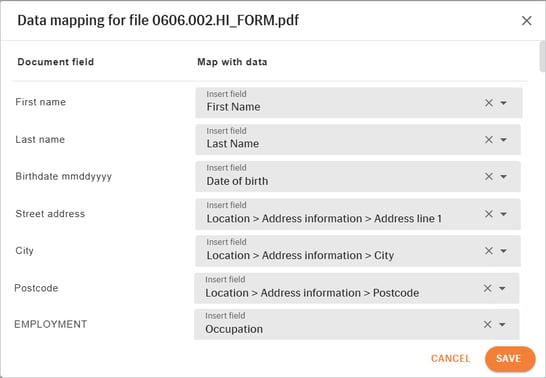
- In the DATA MAPPING dialog, map each document field to an existing Patient Letters insert field and click SAVE.
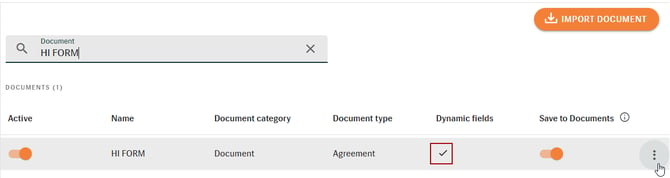
- The document now shows a checkmark in the Dynamic fields column.
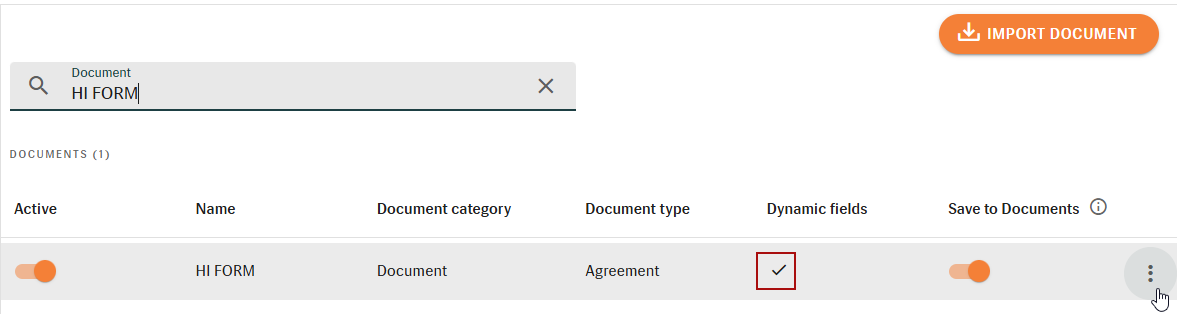
- You can update the mapping or replace the underlying file at any time from the three-dot menu next to the document.
If you replace the file of a dynamic fillable document and the system recognizes that the new file has the same data mapping, you are asked whether to reuse the existing mapping. This means that when only small details of a document have changed, the mapping does not need to be redone from the beginning.
NOTE: Changes to the document configuration, including field mappings and source files, apply only to documents generated after the changes are saved. Previously generated patient letters remain unchanged and retain the data and mappings that were in effect at the time of creation.
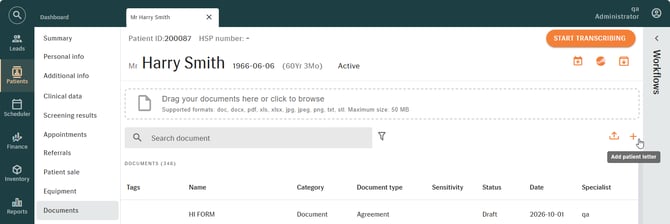
- Generate the document for a patient from PATIENTS > [PATIENT] > DOCUMENTS > ADD PATIENT LETTER.
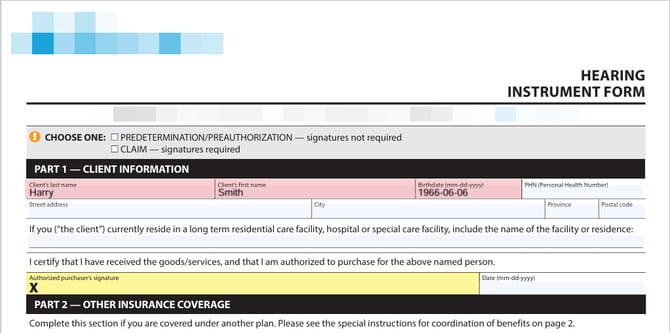
- The mapped fields are automatically populated with the patient's data at the time of generation (e.g., name, date of birth, etc.).
[AU] HSP Claiming Support For Assisted Listening Devices
Inventory > Product catalog
Patients > [Selected patient] > Patient sale
Finance > HSP > Claims
Assisted listening devices (ALDs) can now be sold and claimed under the Hearing Services Program (HSP) alongside hearing aids. ALDs are classified as non-standard products and set up in the Product Catalog with their HSP device code, benefit amount, and ear. This information then carries through pricing, subsidy, quotes, invoices, and claim files. This reduces manual work when preparing HSP claims and helps keep printed documents and claim data consistent.
HOW IT WORKS
Configuration
If you need to claim ALD for HSP, you need to configure the ear side for the product. To do so:
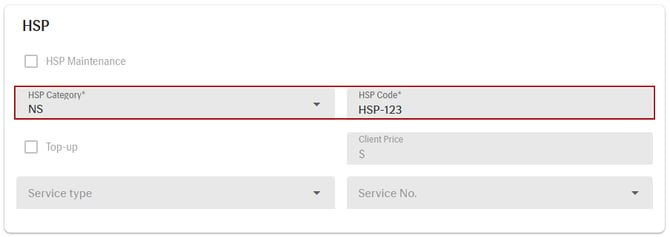
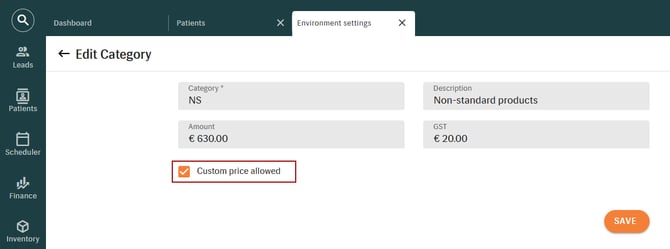
Go to INVENTORY > PRODUCT CATALOG, open the ALD, and set up the accessory with its HSP device code, category, and benefit amount.The new "Side" field, available by default for the Accessories category, specifies the left or right ear. The ear is used to place the device correctly on printed forms.

Select the HPS Category and Code:
Creating a sale
When creating the sale:
- Add the ALD to an HSP sale at PATIENTS > [SELECTED PATIENT] > PATIENT SALE. The Unit Price (Client Price) is filled in from the product's Price Book.
NOTE: If the product is not in the Price Book, the Default Price Book is used, and if it is not found there, the Retail Price from the Product Catalog is used. - Enter the HSP price and the client price to represent a fully subsidized, partially subsidized, or patient-paid device.
- When an invoice is created, Manage checks that an ALD and a hearing aid are not allocated to the same ear and that the required fitting services are present. If the check fails, the invoice cannot be created.
Claims and Exports
After the sale is created, ALDs are handled as follows in HSP documents and claim files:
- Configured ALDs appear in the fitting details of the HSP Device quote and the HSP Tax Invoice claim form, and they flow through claim export and import.
- If an ALD has HSP coverage, it is shown in the device section, in the same way as hearing aids.
- An ALD with no HSP coverage, no ear side setup, and no fitting service is shown as an accessory paid by the patient.
- If both the hearing aid and HSP accessory meet these requirements, the HSP accessory does not show in the HSP tax invoice claim form, and is shown in the Device Quote Template under accessories.
- The HSP export file uses the same placement as the HSP Tax Invoice Claim Form, and the ALD revenue is posted to the HSP revenue account.
NOTE:
- The same-ear check is on by default for all customers and can be turned off in the HSP contract. When it is off, a hearing aid takes priority over an ALD, and the first ALD added to the sale is used for the claim.
[ALL] Payment Summary Report
Reports > Finance > Payment Summary Report
A new Payment Summary Report is now available in Manage. The report provides a summary-only view of payment activity for a selected date range and locations. It shows totals by location, payment method, and payment type, helping finance users, regional managers, and clinic administrators quickly confirm totals against external sources such as cash counts, card terminal totals, bank transfers, and accounting summaries before deciding whether a detailed review is needed.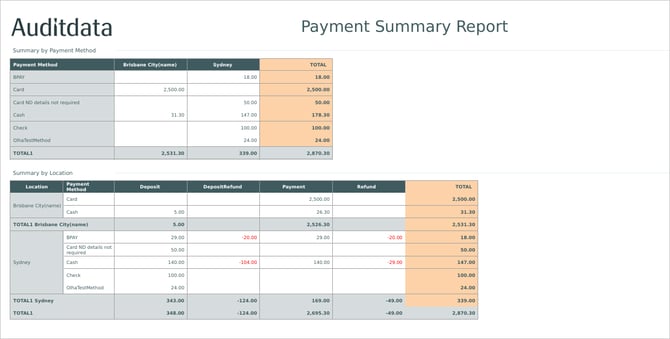
The report includes:
- SUMMARY BY PAYMENT METHOD: a table with a row for each payment method and a column for each location, with a total for each payment method and location, and an overall total.
- SUMMARY BY LOCATION: a table grouped by location and payment method, with separate columns for deposits, deposit refunds, payments, and refunds, a total for each row, a subtotal for each location, and an overall total.
Filters available:
- Date range (payment transactions; defaults to the previous month through the current date)
- Location status (active/inactive)
- Areas
- Regions
- Locations
- Payment type (payment, refund, deposit, or deposit refund)
- Payment method (limited to the payment methods used in transactions for the selected payment types)
2. IMPROVEMENTS
[ALL] hidden unavailable days in Scheduler
My profile > Settings
Company settings > Default settings
Scheduler
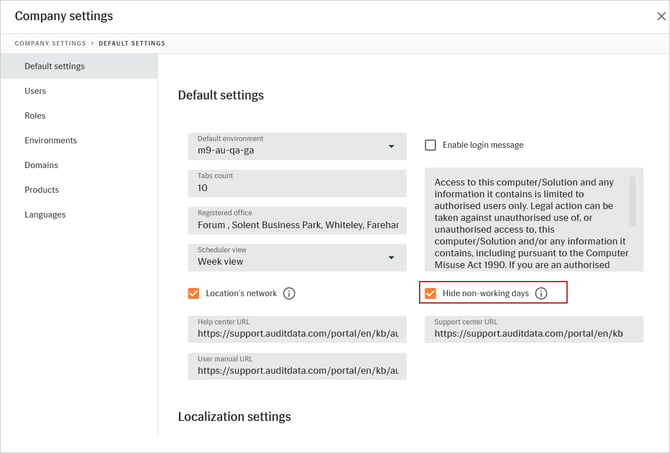
Finding available appointments is now quicker and easier with the option to hide days that have no availability. When enabled, SCHEDULER automatically hides non-working days for selected specialists or locations, such as holidays and days off, while keeping days with available appointment slots visible.
HOW IT WORKS
-
Administrators can enable "Hide non-working days" in COMPANY SETTINGS, which sets the default behavior for all users.
-
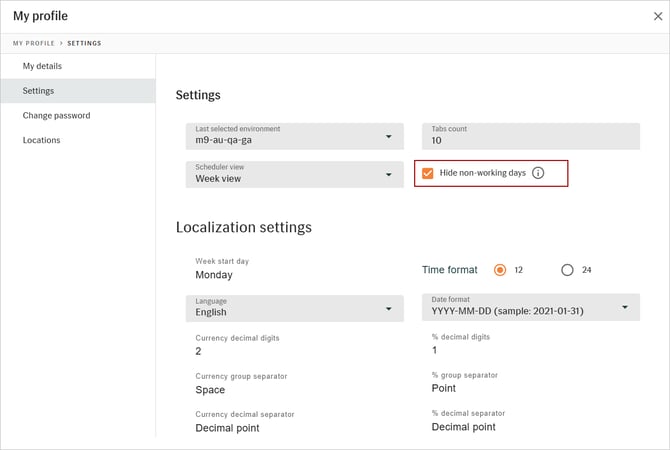
Individual users can also manage this preference in MY PROFILE > SETTINGS and, if needed, choose a different setting from the clinic default.
-
When enabled, days with no working hours, such as closed days or days without a schedule, are automatically hidden in both the SCHEDULER and the "Find Availability" dialog.
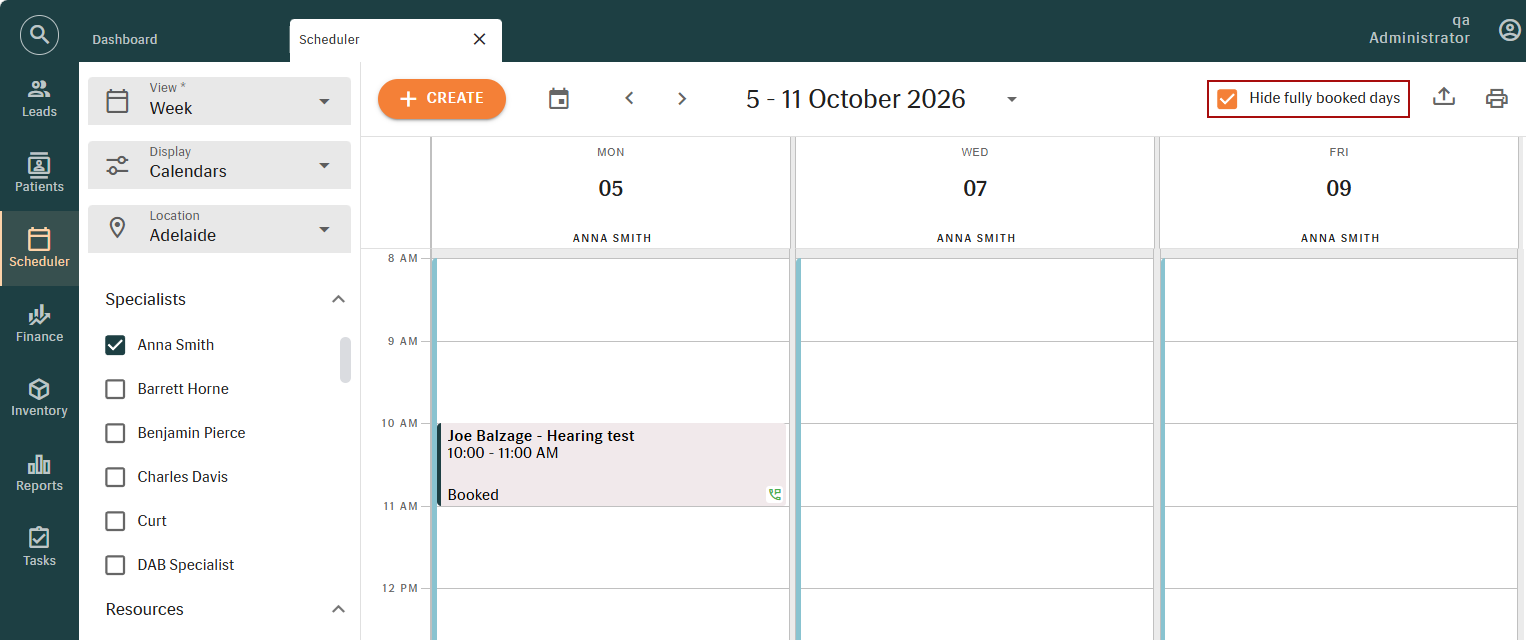
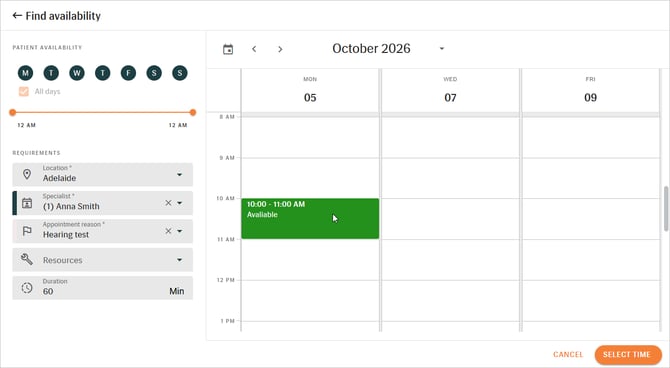
NOTE: If appointments exist on a non-working day, that day remains visible to ensure those appointments are not hidden. -
Users can also select "Hide fully booked days" from the SCHEDULER toolbar.
When enabled, the SCHEDULER hides days where all available appointment slots have already been booked, making it easier to identify days with remaining availability.
Days that still contain at least one available time slot remain visible.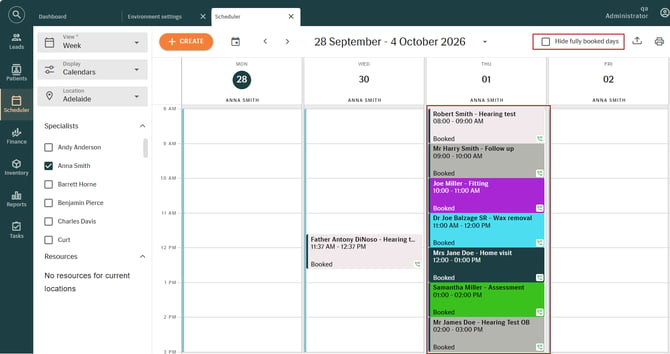
When days are hidden because the "Hide fully booked days" option is enabled, the SCHEDULER displays a message to make users aware that filtered days are not currently shown.
The selected option is remembered for each user and remains active until it is manually turned off.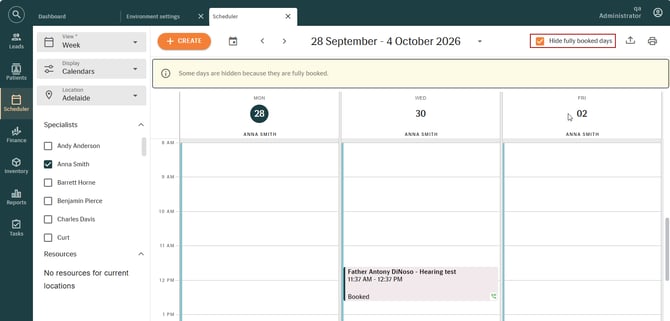
-
The two options work independently and can be used together, allowing clinics to focus only on working days that still have appointment availability.
[ALL] Improved suggested products workflow during sales
Environment settings > Finance settings > Sale related
Patients > [Selected patient] > Patient sale
Clinicians can access relevant product recommendations more efficiently during a Patient Sale or Fast Track Sale. Depending on clinic settings, suggested products may be presented automatically when an item is added to a sale, making it easier to review and add complementary products at the right point in the workflow.
REQUIRED PERMISSIONS
- Patient Sale access is required to use suggested products during sales.
- Access to ENVIRONMENT SETTINGS > FINANCE SETTINGS > SALE RELATED > SUGGESTED PRODUCTS is required to configure automatic suggested product prompts.
HOW IT WORKS
To configure how suggested product recommendations are displayed during a sale, go to ENVIRONMENT SETTINGS > FINANCE SETTINGS > SALE RELATED > SUGGESTED PRODUCTS and enable "Open suggested products automatically".
NOTE: When the setting is disabled, the existing workflow remains unchanged, and suggested products can be opened manually using the SUGGESTED PRODUCTS button.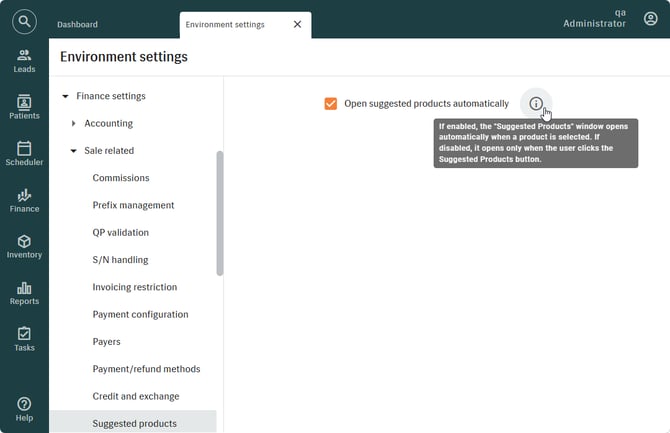
- When the setting is enabled, the SUGGESTED PRODUCTS dialog opens automatically when a product with configured suggested products is added to a sale.
- Review the available recommendations and select one or more products to add to the sale, or close the dialog to continue without adding them.
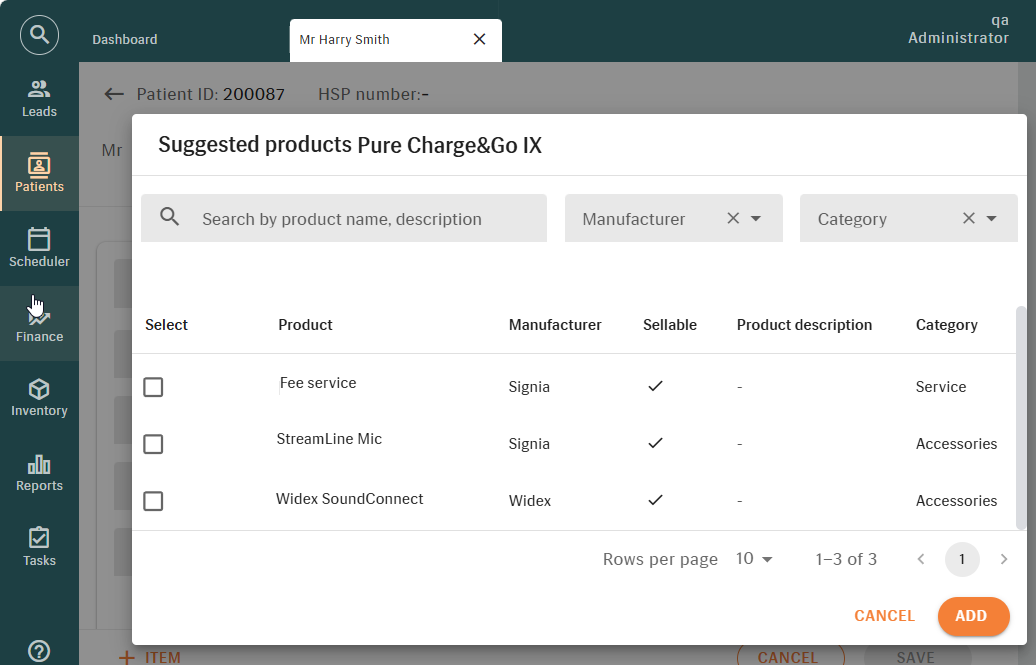
- If a selected suggested product also has its own suggested products configured, a new SUGGESTED PRODUCTS dialog opens automatically for that product.
- If more than one selected product has configured suggested products, the SUGGESTED PRODUCTS dialog does not open automatically. In this case, suggested products can be accessed using the SUGGESTED PRODUCTS button.
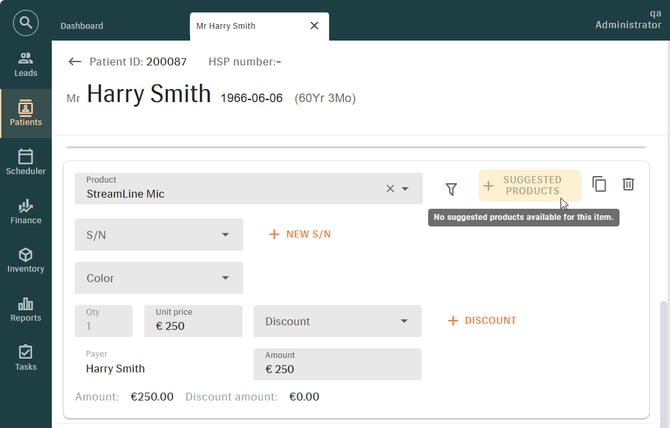
- If no suggested products are configured for the selected item, the SUGGESTED PRODUCTS button is disabled. Hovering over the button displays a tooltip explaining that no suggested products are available.
[ALL] Dedicated Surveys tab for Patient and Lead records
Leads > Surveys tab
Patients > Surveys tab
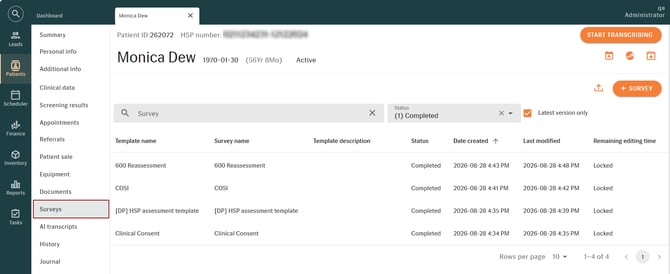
Surveys are now managed from a dedicated SURVEYS tab on the Patient and Lead page. This provides a single location for accessing and managing all surveys associated with a patient or lead, supporting a more structured workflow and improved visibility of survey-related information.
The SURVEYS tab displays key survey details, including the survey name, template, status, creation and modification dates, and remaining editing time. Users can search and filter surveys, review existing records, and initiate new surveys directly from the tab.
NOTE: Existing survey data, history, statuses, permissions, and workflows remain unchanged.
[ALL] "Select all Locations" option Moved to the Location dropdown
Finance > Bulk payments > Create bulk payments
Finance > HSP > Claims
Inventory > Stock management
Inventory > Stock management > [Selected Serialized item] > Serial numbers
Inventory > Stock take
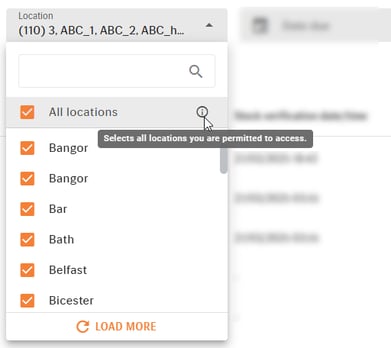
The location selection interface has been updated across the FINANCE and INVENTORY modules. The "All locations" option is now displayed within the LOCATION dropdown. This change consolidates location selection into a single control and aligns the selection process across Inventory workflows.
NOTE: The update applies to multi-select dropdowns only. Individual locations can still be searched for and selected as before.
HOW IT WORKS NOW
- In the INVENTORY module, open the LOCATION dropdown on the STOCK TAKE, STOCK MANAGEMENT, or STOCK MANAGEMENT > SERIAL NUMBERS page.
- In the FINANCE module, open the LOCATION dropdown from the CREATE BULK PAYMENTS > INVOICES section or HSP CLAIMS page.
- Choose "All locations" at the top of the list to select every location the user has permission to access. You can hover over the information icon next to "All locations" for a tooltip describing this behavior.
HOW IT WORKED BEFORE
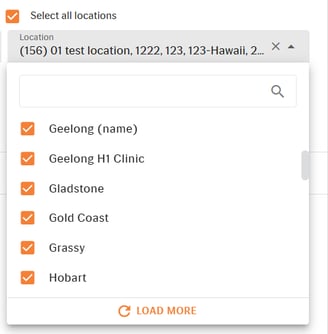
The "Select all locations" checkbox previously displayed above the LOCATION field.
[ALL] Appointment Details Report Now Includes Resources
Reports > Operations > Appointment Details report
The Appointment Details report now includes a "Resource" column that lists the resources of each appointment. Previously, resources were captured in the SCHEDULER but were not available in the report, so users could not include this information in operational reporting.
With resources included in the report, clinics can track which resources are used across appointments, review trends over time, and include this information in management reporting. 
[ALL] Payments and Refunds Report Now Includes Deposits
Reports > Finance > Payments and Refunds report
The Payments and Refunds report now includes deposits and deposit refunds alongside payments and refunds, giving a more complete view of incoming funds and reducing the need to reconcile deposits separately.
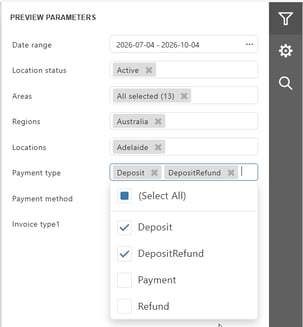
Deposits and deposit refunds can be included by selecting Deposit or Deposit refund in the Payment type filter, either on their own or combined with Payment and Refund.
NOTE: Existing filter behavior for payments and refunds is unchanged, and exported reports include deposits consistently with the on-screen report. 
To reflect the document each payment relates to, the following changes were also made to the report:
- The "Invoice date" and "Invoice number" columns were renamed to "Document date" and "Document number".
- A new "Document type" column shows whether the related document is a Quote, Trial, or Invoice.
- When a deposit was converted into an Invoice, the Document type is shown as Invoice, along with the invoice date and number.
[ALL] Communication Log Data Now Available In The Data Warehouse
Communication log records, which cover the SMS and email messages sent to patients, are now available in the Manage data warehouse. This allows patient communication activity to be included in reporting and analysis alongside other Manage data.
New and updated log entries are synchronized to the data warehouse, where communication volumes, channels, and outcomes can be analyzed alongside other clinic data.
The data is stored in three new tables: Dim_CommunicationChannel, Dim_CommunicationOutcome, and Fact_CommunicationLogs. See section 4.2 DWH Schema Changes for details.
3. PUBLIC API
[ALL] POST: Reliable Patient Matching for Online Bookings [v1, v2]
The Public API now prevents duplicate patient records from being created when a booking is submitted with a phone number that is not in the standard format, for example, missing a country code or a leading zero.
- If a submitted phone number is missing standard formatting, the correct format is applied before the number is checked against the patient's record in Manage.
- If the number matches an existing patient, the appointment is linked to that patient instead of creating a new, duplicate profile.
Endpoints – v1, v2
POST /api/v1/online-booking/appointments
POST /api/v2/online-booking/epos/{eposNumber}/appointments
POST /api/v2/online-booking/locations/{locationId}/appointments
4. TECHNICAL REQUIREMENTS UPDATE
4.1 Current System Requirements
| Operating systems | Windows 10, Windows 11 |
| Supported browsers | Chrome (latest version), Edge (latest version) |
| Language preferences | English |
| Country layers | UK, AU, US, NZ, SG, HG, JP |
| Bridge version | Bridge BE 2.6.0 + Client 2.6.0 |
| Engage version |
1.3.3, 2.0.0 |
| Zapier version | AuditData (4.3.1) |
| Screen resolution | 1920x1200 |
| Internet connection speed | 10Mb/s |
| COUNTRY | TABLE | COLUMN NAME |
|---|---|---|
| ALL | Dim_CashAndChequeAccount | Key field: CashAndChequeAccountId |
| ALL | Dim_CommunicationChannel | Key field: CommunicationChannelId |
| ALL | Dim_CommunicationOutcome | Key field: CommunicationOutcomeId |
| ALL | Fact_CommunicationLogs | Key field: CommunicationLogId |
| AU | Fact_SaleStates | Key field: SaleId |
| US | Fact_UsPurchaseOrders | Key field: UsPurchaseOrderId |
| COUNTRY | TABLE | CHANGE | COLUMN NAME |
|---|---|---|---|
| UK | Dim_NhsContractProduct | Added | CreationDate, ChangeDate |
| ALL | Dim_Product | Added | DescriptionValue |
| ALL | Dim_ProductCategory | Added | CreationDate, ChangeDate |
| ALL | Dim_ProductPathway | Added | CreationDate, ChangeDate |
| ALL | Dim_RepairOrderStatus | Added | CreationDate, ChangeDate, CreatedBy, ChangedBy |
| ALL | Dim_Stock | Added | CreationDate, ChangeDate |
| ALL | Dim_StockAdjustmentReason | Added | CreationDate, ChangeDate |
| ALL | Dim_StockProductItem | Added | ColorId, BatteryTypeId, AddToStockAllowed |
| SG | Fact_CoreCreditNotes | Modified | AppointmentId, AppointmentStart, AppointmentEnd, PatientId, PatientFirstName, PatientLastName, SpecialistId, SpecialistName (changed from required to optional) |
| SG | Fact_CoreInvoices | Modified | SpecialistId, SpecialistName, PatientId, PatientFirstName, PatientLastName, AppointmentId, AppointmentStart, AppointmentEnd (changed from required to optional) |
| SG | Fact_CoreQuotes | Modified | SpecialistId, SpecialistName, PatientId, PatientFirstName, PatientLastName, AppointmentId, AppointmentStart, AppointmentEnd (changed from required to optional) |
| SG | Fact_CoreTrials | Modified | PatientId, PatientFirstName, PatientLastName, SpecialistId, SpecialistName (changed from required to optional) |
| ALL | Fact_Deposits | Added | BankName |
| NZ | Fact_NzPaymentTransactions | Added | BankName, ConvertedFromId |
| NZ | Fact_NzProducts | Added | FunderCode, LocationId |
| AU | Fact_Payments | Added | ConvertedFromId, BankName |
| AU | Fact_ProductSaleHspProductDetails | Added | CustomPrice, CustomTax |
| ALL | Fact_ProductSales | Added | LocationId |
| ALL | Fact_Refunds | Added | ConvertedFromId, BankName, DiffRoundedAmount |
| ALL | Fact_RepairOrders | Added |
ProductColorId, |
| UK | Fact_UkPaymentTransactions | Added | BankName, ConvertedFromId |
| UK | Fact_UkProducts | Added | FunderCode, LocationId |
| US | Fact_UsPaymentTransactions | Added | BankName, ConvertedFromId |
| US | Fact_UsProducts | Added | FunderCode, LocationId |
5. SOLVED ISSUES
[ALL] Specialist Split-Day Overrides Across Locations Not Allowed
Environment settings > Scheduler settings > Specialists > [Selected specialist] > Overrides
-
Previously, arrangements such as a morning shift at one location and an afternoon shift at another for the same specialist were temporarily unavailable. This issue has been resolved, and scheduling specialists across multiple locations on the same day is now supported when Overrides do not overlap.
[ALL] Survey Functionality Missing From Lead Records
Leads > [Selected lead]
-
The SURVEYS tab and +SURVEY action were missing from Lead records, preventing surveys from being created or assigned to a Lead. This has been fixed, and Lead records now provide the same survey functionality as Patient records.
[ALL] Equipment Addition Restricted To Hearing Aids
Patients > [Selected patient] > Equipment
-
Previously, the +EQUIPMENT option on a patient's profile supported only Hearing Aids, so other active products from the Product Catalog, such as Accessories, Batteries, Earmolds, Remote Controls, and RIC Receivers, could not be added to the patient's record. This issue has now been resolved, and any active product from the Product Catalog can now be added as equipment, except products categorized as Service, Repair Service, or L&D Warranty.
[AU] "Reserved By Order" Stock Items Missing From The Stock Overview Report
Reports > Inventory > Stock Overview report
-
Serial numbers of products with the status "Reserved By Order" were previously excluded from the Stock Overview report. This issue has been corrected, and these items are now included in the report.